| L'intégration du widget en mode InShop (colonne The Widget integration in InShop mode (column / tab) ou or Lightbox mode Lightbox, extrêmement facile, s'effectue en uniquement 3 étapes :Initialisation du paiement : depuis votre SI vous devez utiliser la fonction doWebPayment de l'API Web Payment pour initialiser un paiement sur les pages de paiement Payline.Depuis la page web, ajouter un script et d'une balise <DIV> dans le corps de votre page web : Payline va se servir de cette balise pour afficher le formulaire de paiement., takes place in only 3 steps : - Initialization of payment: From your server you use the doWebPayment function of the Web Payment API to initiate a payment on the Payline payment pages.
- From the web page, add a script and a <DIV> tag in the body of your web page: Payline will use this tag to display the payment form.
- Payment Result: From your server you use the getWebPaymentDetails function of the Web Payment API to get the payment result.
The minimum HTML page for generating a payment form is as follows Résultat du paiement : depuis votre SI vous devez utiliser la fonction getWebPaymentDetails de l'API Web Payment pour obtenir le résultat du paiement.
La page HTML minimale pour générer un formulaire de paiement est la suivante : | Bloc de code |
|---|
| language | xml |
|---|
| theme | Confluence |
|---|
| title | Code XML |
|---|
| <html>
<head>
<script src="https://homologation-payment.payline.com/scripts/widget-min.js"></script>
</head>
<body>
<div id="PaylineWidget"
data-token="the token obtained in doWebPayment Response"
data-template="column"
data-embeddedredirectionallowed="false"
/>
</body>
</html>
|
Le The data-token est le jeton de session permettant l'authentification et il est obtenu dans la réponse à la demande d'initialisation d'un paiement (doWebPayment). Afin d'éviter qu'une nouvelle initialisation soit réalisée lors de chaque actualisation de la page, vous devez soit utiliser une session sur votre serveur pour le stocker, ou alors vérifier si l’URL courante contient déjà un jeton de paiement dans un paramètre GET nommé paylinetoken. Voici un exemple pour réutiliser le jeton présent dans l'is the session token for authentication and is obtained in response to the request to initialize a payment (doWebPayment). In order to avoid that a new initialization is performed during each refresh of the page, you must either use a session on your server to store it, or check if the current URL already contains a payment token in a GET parameter named paylinetoken. Here is an example to reuse the token present in the URL: | Bloc de code |
|---|
| language | php |
|---|
| theme | Confluence |
|---|
| title | Code PHP |
|---|
| <?php $paylineToken = ( is_empty($_GET['paylinetoken']) ) ? createNewWebPayment() : $_GET['paylinetoken']; ?> |
Des attributs additionnels que vous pouvez utiliser dans la balise <div> permettent de personnaliser l'affichage du formulaire. Par exemple; si vous ne souhaitez pas que le formulaire de paiement s'affiche automatiquement lors de l'affichage de votre Additional attributes that you can use in the <div> tag allow you to customize the display of the form. For example; if you do not want the payment form to appear automatically when viewing your page : | Paramètre | Description | valeur |
|---|
data-template Le nom du template à utiliser pour l'initialisation du formulaire | The name of the template to use for initializing the form. | - tab
- column
- lightbox
- shortcut
| data-auto-init Définit si le | formulaire doit s’initialiser dès que la page web a fini de se charger Defines whether the form should initialize as soon as the web page has finished loading (auto-init à « to "true »), ou s’il doit attendre un demande d’initialisation "), or if it must wait for an initialization request (auto-init à « to "false »") | |
| data-embeddedredirectionallowed Permet de présenter la page d’authentification 3DSecure en mode iframe (intégré dans la page de paiement) valeur true ou en mode redirection (redirection plein écran dans une nouvelle page) valeur false. Vérifier avec le support que la banque est bien dans la liste blanche pour l'autorisation en | Used to present the 3DSecure authentication page in iframe mode (integrated in the payment page) value true or in redirection mode (full-screen redirection in a new page) value false. Check with the support that the bank is in the white list for authorization in lightbox. | | data-partnerreturnurl | The parameter allows you to specify a return url for a defined list of partners, for now: AmazonPay When the buyer clicks on the AmazonPay button, he is redirected to the partner to authenticate. Once authenticated, it is redirected to the specified URL Le paramètre permet de spécifier une url de retour pour une liste définie de partenaires, pour l'instant : AmazonPay Lorsque l'acheteur clique sur le bouton AmazonPay il est redirigé chez le partenaire pour s'authentifier. Une fois authentifié, il est redirigé sur URL indiqué. | <div id="PaylineWidget"
data-template="shortcut"
data-partnerreturnurl="https://maboutique.com/checkout"> |
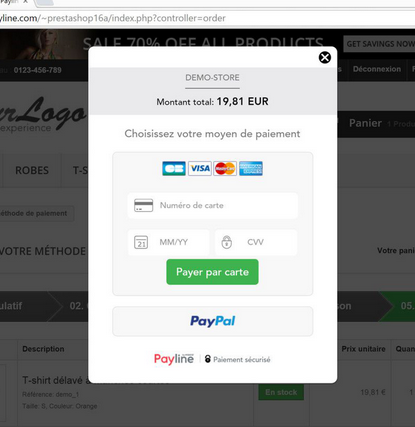
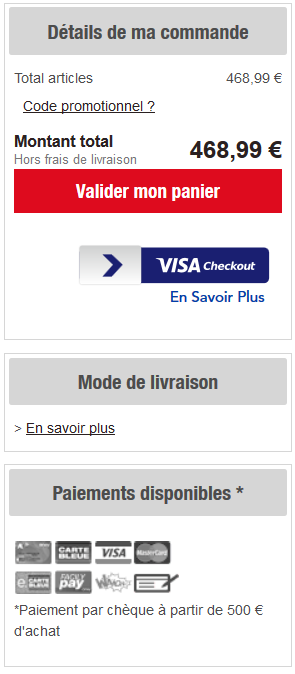
Suivant les paramètres, voici les exemples d'intégration :
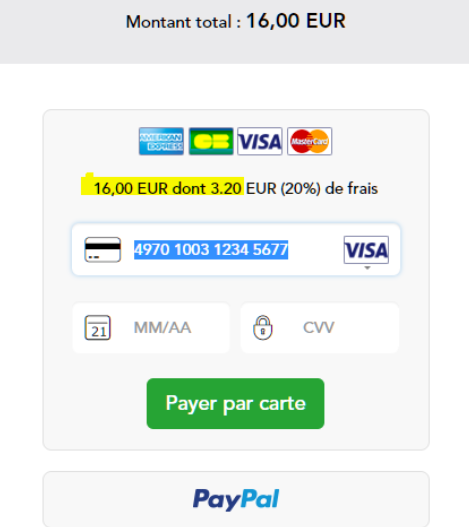
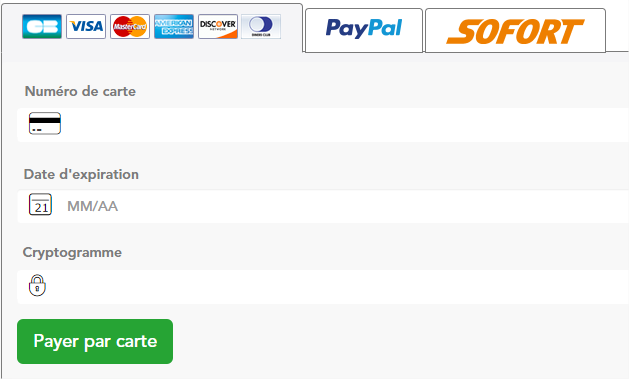
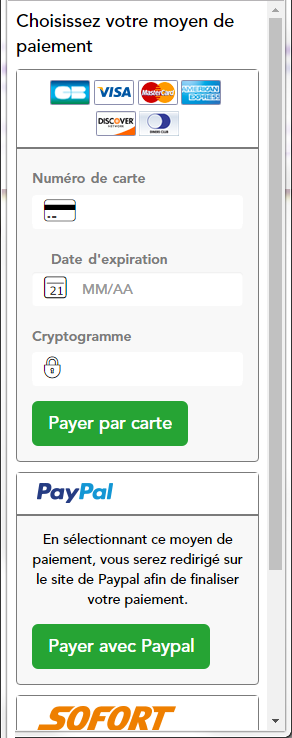
According to the parameters, here are the examples of integration : | InShop Tab mode | InShop Column mode | LightBox mode | Shortcut mode | mode InShop Tab | mode InShop Column | mode LightBox | mode shortcut |
|---|
|  | | |
| Info |
|---|
Payline force l’affichage en mode « column » des pages de paiement lorsque vous utilisez le mode « tab » et que la taille de l’appareil utilisé par le consommateur est trop petite pour s’afficher correctement. Cette amélioration simplifie votre intégration technique lorsque vous avez une boutique « responsive desktop / mobile ». |
Pour obtenir la mise en forme du formulaire de paiement, vous devez intégrer la feuille de style CSS Payline en ajoutant la ligne suivante dans la balise <head> forces column page display of payment pages when you use tab mode and the size of the device used by the consumer is too small to display properly. This enhancement simplifies your technical integration when you have a "responsive desktop / mobile" store. |
To get the form of the payment form formatted, you have to integrate the CSS Payline style sheet by adding the following line in the <head> tag: | Bloc de code |
|---|
| language | xml |
|---|
| theme | Eclipse |
|---|
| title | Code XML |
|---|
| <link href="https://homologation-payment.payline.com/styles/widget-min.css" rel="stylesheet" /> |
| Info |
|---|
Les The URLs du script et de la CSS sont différents entre les environnements de test et de production. Nous vous conseillons de les configurer dans des variables d'environnements. |
Afin d’interagir avec le formulaire de paiement, Payline propose une API en JavaScript pour que vous gardiez la main sur le formulaire. Les fonctions disponibles de votre SI sont : of the script and CSS are different between the test and production environments. We recommend that you configure them in environment variables. |
In order to interact with the payment form, Payline offers a JavaScript API to keep your hand on the form. The available functions of your IS are: | Function | Description | Example |
|---|
| endToken() | Ends the life of the web session token (token obtained via DoWebPayment). Parameters | | Fonction | Description | Exemple |
|---|
| endToken() | Met fin à la vie du jeton de session web (token obtenu via DoWebPayment). Les paramètres :
( additionnalData : any,
callback : Function,
spinner : any,
handledByMerchant : boolean ) |
| Développer |
|---|
|
Payline.Api.endToken(null, function() {
window.location.href = Payline.Api.getCancelAndReturnUrls().cancelUrl;
}, null, true);
// en valorisantvaluing handledByMerchant àto true,
// the lapayment session dewill paiementbe seraassociated associéewith aureturn code retour 02014
// renvoyéreturned parby getWebPaymentDetails.
// DansOtherwise le cas contraire c'est le the code 02319 qui estis renvoyéreturned. |
| | finalizeShortCut() | Déclenche la finalisation du paiement ShortCut (à appeler en Triggers the finalization of the payment ShortCut (to call in context.state PAYMENT_TRANSITIONAL_SHORTCUT) |
| | getBuyerShortCut() | Returns a complex object containing buyer data from the shortcut partner. This function is available in a context of Renvoi un objet complexe contenant les données de l'acheteur provenant du partenaire shortcut. Cette fonction est disponible dans un contexte de state = PAYMENT_TRANSITIONAL_SHORTCUT. |
| Développer |
|---|
| { "firstName": "DUPONT",
"lastName": "Jean",
"email": "jean.dupont@yopmail.com",
"cityName": "Aix",
"country": "FR",
"street1": "5 rue de Marseille",
"street2": "Batiment 2",
"zipCode": "13390"
} |
| | getCancelAndReturnUrls() | Renvoie un objet complexe contenant la returnUrl et la cancelUrl provenant du DoWebPayment | Returns a complex object containing the returnUrl and the cancelUrl from the DoWebPayment | For example, you can create a cancel button that triggers the following actionsOn peut par exemple créer un bouton annuler
qui déclenche les actions suivantes :
| Développer |
|---|
| function cancel() {
Payline.Api.endToken();// metend finthe à la vie du tokentoken's life
window.location.href =
Payline.Api.getCancelAndReturnUrls().cancelUrl;
// redirigeredirect l'utilisateurthe suruser lato cancelUrl |
| | getContextInfo(key) | Renvoi une information du contexte grâce à sa clé parmi les valeurs suivantes Returns a context information with its key from the following values: |
| Développer |
|---|
| { "PaylineAmountSmallestUnit": 100,
"PaylineCurrencyDigits": 2,
"PaylineCurrencyCode": "EUR",
"PaylineBuyerFirstName": "Jean",
"PaylineBuyerLastName": "DUPONT", "PaylineBuyerShippingAddress.street2": "Batiment 2",
"PaylineBuyerShippingAddress.country": "FR",
"PaylineBuyerShippingAddress.name": "Perso",
"PaylineBuyerShippingAddress.street1": "5 rue de Marseille",
"PaylineBuyerShippingAddress.cityName": "Aix",
"PaylineBuyerShippingAddress.zipCode": "13390"
"PaylineBuyerMobilePhone": "0605040302",
"PaylineBuyerShippingAddress.phone": "0605040302",
"PaylineBuyerIp": "127.126.125.100",
"PaylineFormattedAmount": "EUR1.00",
"PaylineOrderDate": "05/26/2008 10:00",
"PaylineOrderRef": "170630111901",
"PaylineOrderDeliveryMode": "4",
"PaylineOrderDeliveryTime": "1",
"PaylineOrderDetails": [ { "ref": "1",
"price": 998,
"quantity": 1,
"comment": "commentaire1",
"category": "1",
"brand": "66999",
"subcategory1": "",
"subcategory2": "",
"additionalData": ""
}
],
} |
| getCssIframeWhiteList()Renvoie la liste | des primitives CSS acceptées pour styliser les champs protégés (Carte bancaire, CVV, …Returns the list of accepted CSS primitives for stylizing protected fields (Credit Card, CVV, ...) | getCssIframeWhiteList(): any | getFragmentedPaymentInfo()Dans un contexte | de paiement fragmenté (Carte Cadeau Carrefour, prochainement ANCV, …), permet de récupérer les différents paiements enregistrés jusqu’à maintenantIn a context of fragmented payment (Carrefour Gift Card, soon ANCV, ...), allows to recover the various payments registered so far. |
| Développer |
|---|
| { "amount": "100,00 EUR", // Montant global de la commande
"amountLeft": "50,00 EUR", // Montant restant à payer
"recaps": [ 503200XXXXXXXXX1166: "50,00 EUR" ] } |
| | getLanguage()Renvoi la clé du language du widget (passé dans la | trame DoWebPaymentReturn the widget's language key (passed in the DoWebPayment frame) | "en", "fr", … | | getOrderInfos() | Retrieves a complex object containing: - the amount with the currency all formatted
- the order reference
- the name of the point of sale
- a complex object representing the address with:
- address1
- address 2
- city
- Postal code
Permet de récupérer un objet complexe contenant: le montant avec la devise le tout formatéla référence commandele nom du point de venteun objet complexe représentant l'adresse avec :adresse 1adresse 2villecode postal |
| Développer |
|---|
| Payline.Api.getOrderInfos()
on
We obtientget :
Object {
   amountCurrency: "15.00 EUR"
   orderRef: "order-123456789"
   pointOfSale: "POS_Demo"
   pointOfSaleAddress:
   Object {
       addess1: "260 rue Claude Nicolas Ledoux"
       addess2: "ZI Les Milles"
       city: "Aix en Provence"
zipCode: "13290" }} |
| | getRecurringDetails() | Permet de récupérer l'échéancier du paiement Retrieves the payment schedule. Voir le détail d'intégration : paiement N fois et paiement récurrent. See the integration details: payment N times and recurring payment. | To display the schedule N timesPour afficher l'échéancier N fois : | Développer |
|---|
|
| Bloc de code |
|---|
| language | xml |
|---|
| theme | Confluence |
|---|
| Payline.Underscore.forEach( Payline.Api.getRecurringDetails().schedules, function(key, value) { console.log(value + " " + key) } ); |
|
PourTo récupérerretrieve lesrecurring détails du paiement récurrent payment details:
| Développer |
|---|
|
| Bloc de code |
|---|
| language | xml |
|---|
| theme | Confluence |
|---|
| Payline.Api.getRecurringDetails().schedules; |
|
| getToken() | Retourne le token courant avec lequel le Widget a été initialisé :Returns the current token with which the Widget was initialized. | getToken() | | hide() | Demande de masquage du formulaire de paiementRequest to hide the payment form. | Payline.Api.hide(): void | init() | Demande d'initialisation du formulaire de paiement. Lors de l'initialisation, le widget Payline construit le formulaire en fonction du contexte de la demande de paiement: montant, moyen de paiement proposéRequest to initialize the payment form. During initialization, the Payline widget builds the form according to the context of the payment request: amount, proposed payment method, etc. |
| | isSandBox() | Permet de connaitre l’environnement Allows to know the environment: production ou or homologation. La fonction retourne true ou The function returns true or false. | Payline.Api.isSandbox(); | | reset() | Réinitialise totalement le widget avec le token et le template passé en paramètreTotally reset the widget with the token and template passed as parameter |
| Développer |
|---|
|
| Bloc de code |
|---|
| language | xml |
|---|
| theme | Confluence |
|---|
| Payline.Api.reset(token: string = null, template: string = null): void |
|
| | show() | Demande d'affichage du formulaire de paiementRequest to display the payment form. | Payline.Api.show(): void | | toggle() | Si le widget est affiché, cette méthode le cache, sinon elle l'afficheIf the widget is displayed, this method hides it, otherwise it displays it |
| | updateWebpaymentData()Mise à | jour des informations de la session de paiement (adresses, montantUpdate of the payment session information (addresses, amount, ...) après l'initialisation du widget et avant la finalisation du paiementafter the initialization of the widget and before the finalization of the payment. |
| Développer |
|---|
| Payline.Api.updateWebpaymentData(Payline.Api.getToken(), JSON, callBack);
ContenuContents of duthe JSON :
{
"payment": {
    "amount": "252",
    "currency": "978" },
"order":
  {
    "amount": "255",
    "currency": "978",
    "ref": "123",
    "deliveryTime ": "1",
    "deliveryMode ": "1",
    "deliveryExpectedDate": "30/09/2016",
    "deliveryExpectedDelay": "1",
    "details": {
        "details":

     [  { "ref": "00001 (ref1)",
          "price": "50",
         "quantity": "1",
         "comment": "comment1 (rem1)",
         "category": "1",
         "brand": "My HERMES (brd1)",
         "subcategory1": "BOSS",
         "subcategory2": "MONTRE",
         "additionalData": "LegalAge=18;Discount=0105",
         "taxRate ": "1234"
        },
        { "ref": "00002 (ref2)",
          "price": "50",
          "quantity": "1",
          "comment": "comment2 (rem2)",
          "category": "1",
          "brand": "My HERMES (brd2)",
          "subcategory1": "HERMES",
          "subcategory2": "FOULARD",
          "additionalData": "LegalAge=18;Discount=0105",
          "taxRate ": "1234"
         },
         { "ref": "00003 (ref3)",
         "price": "50",
         "quantity": "1",
         "comment": "comment3 (rem3)",
         "category": "1",
         "brand": "My HERMES (brd3)",
         "subcategory1": "HERMES",
         "subcategory2": "MONTRE",
         "additionalData": "LegalAge=19;Discount=0105",
         "taxRate ": "1234"
          }
      ]
    }
  },
"buyer": {
  "shippingAddress": {
    "title": "2",
    "name": "BUYER (shipping)",
    "lastName": "PAYLINE (shipping)",
    "firstName": "Validation Team (shipping)",
    "street1": "Colombus Circle (shipping)",
    "street2": "Central Park (shipping)",
    "cityName": "New York (shipping)",
    "zipCode": "NY 10023",
    "country" : "FR",
    "phone" : "0123458789",
    "state": "NYC (state)",
    "county": "Upper East Side (shipping)",
    "phoneType": "1"
  },
  "billingAddress": {
    "title": "3",
    "name": "BUYER (billing)",

"lastName": "TUPU (billing)",
    "firstName": "Christian (billing)",
    "street1": "15 rue LEDOUX (billing)",
    "street2": "Z.I. les Milles (billing)",
    "cityName": "Aix-en-Provence (billing)",
    "zipCode": "13902",
    "country" : "FR",
    "phone" : "0223458789",
    "state": "FRANCE (state)",
    "county": "Bouches-du-Rhone",
    "phoneType": "4"
  }
 }
} |
|
Example to hide and then display the payment form: - Payline.Api.hide (): void
- Payline.Api.show (): void
Exemple pour modifier le libellé sur bouton Payer : Vous pouvez le changer via l’instruction JavaScript Example to change the label on Pay button: - You can change it using the JavaScript statement Payline.jQuery ('.
pltextlibellé du boutonExemple pour modifier le libellé sur bouton Payer : Vous devez récupérer le montant Example to change the label on Pay button: dans la langue de l’acheteur via un appel à la fonction - You must recover the amount in the language of the buyer via a call to the function
- Payline.Api.getContextInfo ('PaylineFormattedAmount');
Vous pouvez modifier le texte du bouton avec la fonction : - You can change the text of the button with the function: Payline.jQuery ("
<classe de l’élément à modifier>- <class of the element to modify>").
text<texte de remplacement>
Attention, toujours utiliser les classes pour ces instructions, jamais l’id de l’élément qui est généré à la volée Warning, always use the classes for these instructions, never the id of the element that is generated on the fly Pour afficher le montant dans le bouton. L’instruction est donc- To display the amount in the button. The statement is therefore
PaylineWidget - paylineWidget .pl-pay-btn, .PaylineWidget .pl -btn").
textPayer - Pay' + Payline.Api.getContextInfo ('PaylineFormattedAmount'));
Cette instruction doit être appelée lorsque le widget déclenche l’évènement « didshowstate » avec l’état - This statement must be called when the widget triggers the " didshowstate " event with the PAYMENT_METHODS_LIST state .
Personnalisation Personnaliser le style du formulaire de paiement est possible en surchargeant la feuille de style fournit par défaut par Payline. Les possibilités de personnalisation sont infinies, voici quelques exemples simplesCustomizing the style of the payment form is possible by overloading the default style sheet provided by Payline. The possibilities of customization are endless, here are some simple examples: | Description | Paramètre |
|---|
| la couleur du bandeau EnseigneThe color of the banner Sign | #PaylineWidget .pl-header-title-wrapper { background-color: #ABCDEF; } | | la couleur du texte de l'EnseigneThe color of the sign's text | #PaylineWidget .pl-header-title-content h4 { color: #ABCDEF; } | | la couleur du texte du montant à payerThe color of the text of the amount to be paid | #PaylineWidget .pl-header-title-content p { color: #ABCDEF; } | | La couleur du bouton de paiementThe color of the payment button | #PaylineWidget .pl-pay-btn { background-color: #ABCDEF; }
#PaylineWidget .pl-pay-btn:hover { background-color: #ABCDEF; } | | La couleur de fond du formulaireThe background color of the form | #PaylineWidget .pl-body { background-color: #ABCDEF; } | | La couleur de la zone moyen de paiementThe color of the area of payment | #PaylineWidget .pl-pmContainer {
background-color: #ABCDEF;
border-color: #ABCDEF; } | | la couleur du bouton fermer la The color of the button close the lightbox | #PaylineWidget .pl-icon-close { color: #ABCDEF; } | The size of the window is optimized in the following configuration: La taille de la fenêtre est optimisée dans la configuration suivante : width minimum de la width maximum conseillée de la div PaylineWidget : 900pxAu dessous et au dessus des dimensions indiquées, il est préconisé d'ajuster les marges et champs. Pour cacher les labels, il faut supprimer les labels et supprimer la marge à gauche des champs- maximum recommended width of the PaylineWidget div: 900px
Below and above the indicated dimensions, it is recommended to adjust the margins and fields. To hide the labels, you must remove the labels and delete the margin to the left of the fields. | .PaylineWidget.pl-container-default .pl-pmContainer .pl-label-input
{ display: none;}
.PaylineWidget.pl-container-default .pl-pmContainer .pl-input-group-container
{ margin-left: 0; }
| | Payline propose de réduire les marges afin d'ajuster la fenêtre au dessus de 900px de large, pour cela il suffit de diminuer la largeur du label (xx%), et de diminuer la marge à gauche des champs (yy% par défaut proposes to reduce the margins in order to adjust the window above 900px wide, for that it is enough to decrease the width of the label (xx%), and to decrease the margin to the left of the fields (yy% by default 30% ). | .PaylineWidget.pl-container-default .pl-pmContainer .pl-label-input
{ width: xx%; }
.PaylineWidget.pl-container-default .pl-pmContainer .pl-input-group-container,
.PaylineWidget.pl-container-default .pl-form-container label.pl-remember-container
{ margin-lef: yy%; } |
Pour obtenir plus d'information sur la liste des balises, veuillez trouver les informations ici.
Callback du cycle de vie
For more information on the list of tags, find the information here. | Inclusion d'extrait |
|---|
| DT:PW - Personnalisation du Customizing the widget: Fonction CallBack function |
|---|
| DT:PW - Personnalisation du Customizing the widget: Fonction CallBack function |
|---|
| nopanel | true |
|---|
|
|