Contents
Presentation
The Payline Kit is for merchants, so they can easily test the features offered. It includes a web interface to call webservices API Payline.
A test merchant and his VAD contracts must be created before using this demo kit.
With each payment, it is possible to select the contract on which the transactions will be authorized and delivered.
In web mode, and once the context parameters are defined, you will be redirected to a payment page allowing you to enter the information on the card:
- Card Number
- Expiration date
- Visual cryptogram
Connexion au kit de démo
The web link: : http://concupourvendre.com/kitphp/login.php
You must then authenticate:
- Login: your email address
- Password: sent to the corresponding address.
.

Then you must add your merchant or select it. You must collect the following information about the Payline Administration Center: https://homologation-admin.payline.com/

The menu
Once connected, the homepage offers the following menu:
- Home : allows pre-configured payment fields and lists transactions;
- Web : allows you to perform the authorization and retrieve the result with a redirected web page;
- Direct : allows to realize some web services of the Payline API live;
- Wallet : allows to realize the web services associated with wallets;
- Extended : allows the realization of the web services associated with the results of the operations;
- Ajax API : allows to realize the web services associated with Ajax API mode.

Check and prepare the configuration
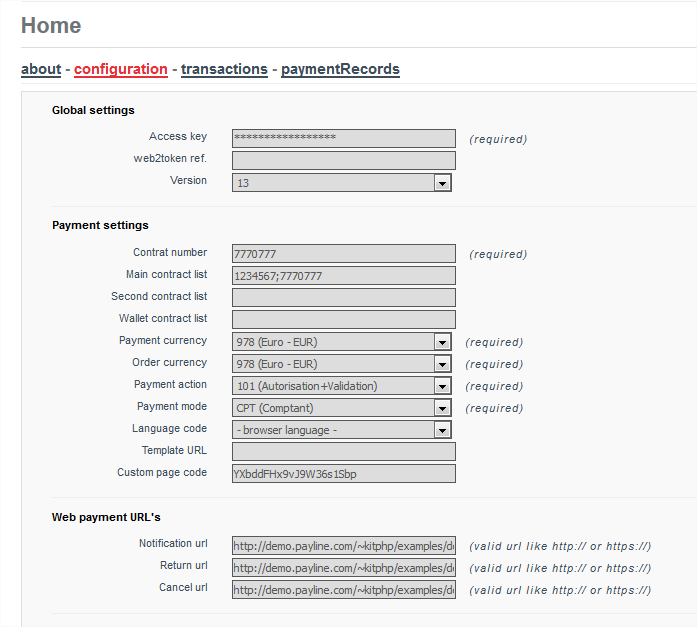
The following tags should be defined:
- Version : version of the web services;
- Contract number : VAD contract to use for the transaction;
- Main contract list : list of VAD contracts to offer to the consumer;
- Customer Id : mandatory customer reference.
Selecting the integration mode
You must select the web services corresponding to your integration:
- web mode
- with the service doWebPayment option template = ' redirect ' or ' lightbox ' or ' in shop-tab ' or ' in shop-column '.
- with the shortcut
- direct mode with the doAuthorization service.

Generate a payment page
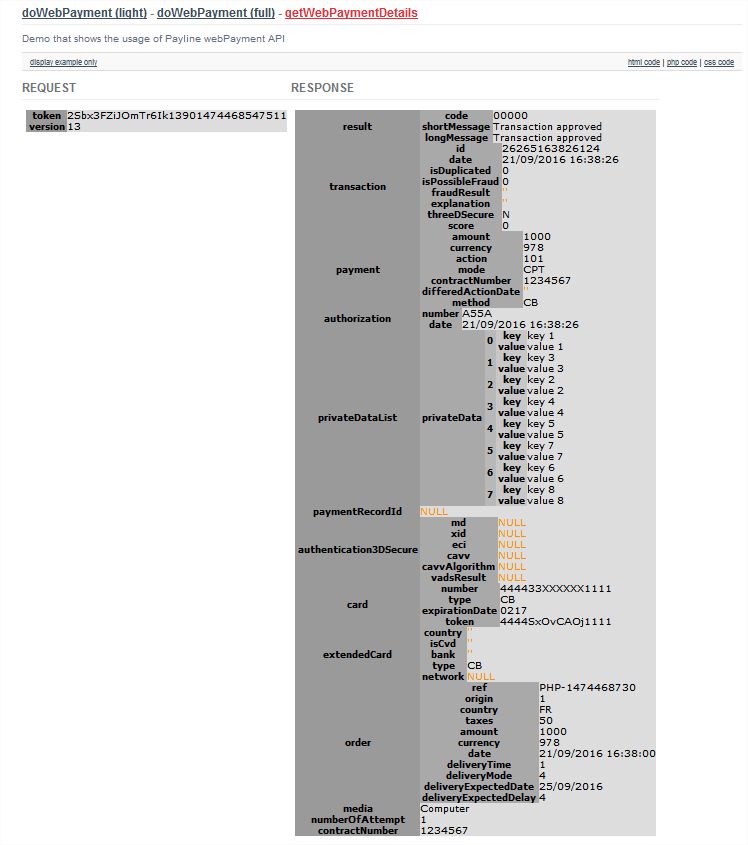
Click the WEB tab then doWebPayment (light) or (Full) and fill in the following tags:
- Version
- Amount
- Order reference
- Customer Id
Click on fullWebPayment (full) or doWebPayment (light) to execute the service:

Generate a page with the Widget API
The page presented above proposes at the bottom of the page a drop-down list with the types of widget:

Error management
For error handling based on the amount of the transaction: see the documentation below.

Redirect payment web page
1 / Select one of the payment methods proposed and validate the payment.

This page is optional, just indicate only one contract in Main Contract.
Selection of VISA, MASTERCARD, CB
2 / Enter a test card and validate
- Number: 4444333322221111
- Date: after today's date
- CVV: 123

3/ Payline affiche le ticket de paiement

Cette page est optionnelle, elle peut être configuré sur le point de vente.
3 / Payline displays the payment ticket
This page is optional, it can be configured at the point of sale.
4 / The kit displays the return frame